|
|
Step by step instructions to permanentely repair that leaky/dry concrete crack
STEP 1: Cleaning the Area to be Repaired
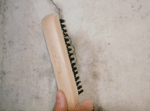 Using a wire brush, clean all loose concrete, paint, dirt and all other debris in the area
to be repaired up to 5cm on either side of the repair area. Wipe the crack area down with a damp cloth.
Use a chisel to remove loose concrete if necessary.
Using a wire brush, clean all loose concrete, paint, dirt and all other debris in the area
to be repaired up to 5cm on either side of the repair area. Wipe the crack area down with a damp cloth.
Use a chisel to remove loose concrete if necessary.
|
STEP 2: Installing Injection Ports
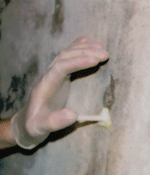 To anchor the injection port into place, spread some adhesive on the back of the port being
cautious not to cover the injection hole. Place the port over the crack and hold until secure. Spread
some adhesive around base of port to anchor (see adhesive label for mixing procedures).
To anchor the injection port into place, spread some adhesive on the back of the port being
cautious not to cover the injection hole. Place the port over the crack and hold until secure. Spread
some adhesive around base of port to anchor (see adhesive label for mixing procedures).
Place the first port at or near floor level. The rest of the ports should be spaced evenly
apart with the distance between each port equal to the thickness of the wall (usually 8"). NOTE: If
the crack is in a corner, special corner parts are available by calling 1-800-575-5325.
|
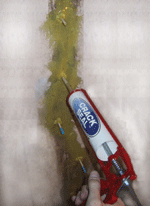
STEP 3: Capping the Surface with Adhesive
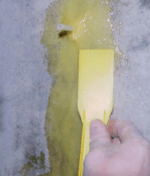 Spread the stop-leak crack adhesive over the dry/wet crack, starting at the bottom. Do not mix more than you can use within
5 minutes. If the crack protrudes above ground level on the outside, be sure to cap that surface as well.
Remember to first clean the crack on the outside with a wire brush as outlined in STEP 1 above. ALLOW ADHESIVE
TO DRY COMPLETELY BEFORE CONTINUING WITH THE REST OF THE APPLICATION. (APPROXIMATELY 5-10 MINUTES).
Spread the stop-leak crack adhesive over the dry/wet crack, starting at the bottom. Do not mix more than you can use within
5 minutes. If the crack protrudes above ground level on the outside, be sure to cap that surface as well.
Remember to first clean the crack on the outside with a wire brush as outlined in STEP 1 above. ALLOW ADHESIVE
TO DRY COMPLETELY BEFORE CONTINUING WITH THE REST OF THE APPLICATION. (APPROXIMATELY 5-10 MINUTES).
|
STEP 4: Flushing the Crack with Water
 Establishing water flow through the crack is ESSENTIAL. Use a hand-held water spray bottle to establish flow
throughout the crack. Start at the top port and inject water alternately into the three highest ports, allowing
the water to drain from the lower injection ports. IN CASE OF LEAKAGE, STOP FLUSHING AND RESEAL WITH ADHESIVE.
This procedure ensures continuity along the crack and cleans the crack of any foreign debris, grit, sand, dust, etc. which
may inhibit the flow of the repair material.
Establishing water flow through the crack is ESSENTIAL. Use a hand-held water spray bottle to establish flow
throughout the crack. Start at the top port and inject water alternately into the three highest ports, allowing
the water to drain from the lower injection ports. IN CASE OF LEAKAGE, STOP FLUSHING AND RESEAL WITH ADHESIVE.
This procedure ensures continuity along the crack and cleans the crack of any foreign debris, grit, sand, dust, etc. which
may inhibit the flow of the repair material.
|
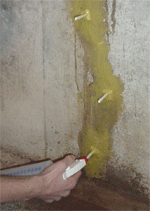
STEP 5: Injection - Sealing the Wet/Dry Crack
 Cut the end off the injection cartridge and screw on the injection tip. Place the cartridge
into your sturdy, quality caulking gun. Starting from the bottom port, insert the vinyl tube
over the injection port and inject slowly, applying even pressure, allowing material plenty of time
to react. When the resin flows out of the next injection port (this should take approximately 20-60 seconds),
cap the current port and continue injecting through the next port. Remember: Inject until flow to next port
is established, cap current port, inject in next port until flow is established to the third, etc.
IN CASE OF LEAKAGE, STOP INJECTING AND RESEAL WITH ADHESIVE. If flow to the next port is not established, increase
pressure to break the plugged material. If flow is still not established, release the pressure on the caulking gun and stick
a long, fine wire into the injection port to try to break the plugged material. Try to inject more material in to this port.
If flow is still not established, inject from the top, down. WARNING: BE CAREFUL AROUND FLOOR DRAINS AND DRAINAGE TILE.
Cut the end off the injection cartridge and screw on the injection tip. Place the cartridge
into your sturdy, quality caulking gun. Starting from the bottom port, insert the vinyl tube
over the injection port and inject slowly, applying even pressure, allowing material plenty of time
to react. When the resin flows out of the next injection port (this should take approximately 20-60 seconds),
cap the current port and continue injecting through the next port. Remember: Inject until flow to next port
is established, cap current port, inject in next port until flow is established to the third, etc.
IN CASE OF LEAKAGE, STOP INJECTING AND RESEAL WITH ADHESIVE. If flow to the next port is not established, increase
pressure to break the plugged material. If flow is still not established, release the pressure on the caulking gun and stick
a long, fine wire into the injection port to try to break the plugged material. Try to inject more material in to this port.
If flow is still not established, inject from the top, down. WARNING: BE CAREFUL AROUND FLOOR DRAINS AND DRAINAGE TILE.
|
STEP 6: Finishing
48 hours after injection, injection ports and sealing cement can be removed if you wish. (Just Peal Off)
|
| WARNING |
DO NOT inject between wood and concrete. IN THE CASE of seepage due to water runoff, crack may have to be plugged with FAST PLUG compound.
THE TEMPERATURE of the concrete must be at least 5şC.
RUBBER GLOVES must be worn.
PROTECTIVE EYE gear must be worn. (i.e. face shield, goggles or safety glasses). ENSURE GOOD VENTILATION or wear respirator.
|
|
|
|